GPU Service Instances
GPU Service Instances let you launch an SSH-accessible GPU instance within minutes.
This gives you a virtual-machine-like environment — containing a single device or multiple devices — for tasks such as learning, inference, testing, and fine-tuning.
Under the hood, each GPU Service Instance is backed by a Kubernetes Pod, so mixing GPU instances and CPU-only instances improves the resource utilization of the whole machine (VM or bare metal).
GPUStack manages multiple Kubernetes clusters and provides a unified interface for launching GPU Service Instances on any of them.
Prerequisites
To use GPU Service Instances, you need at least one Kubernetes cluster.
The first time you open the GPU Service > GPU Instances page without any cluster added, you are prompted to add one.

Click Add a Kubernetes Cluster to go to the Resources > Clusters page.
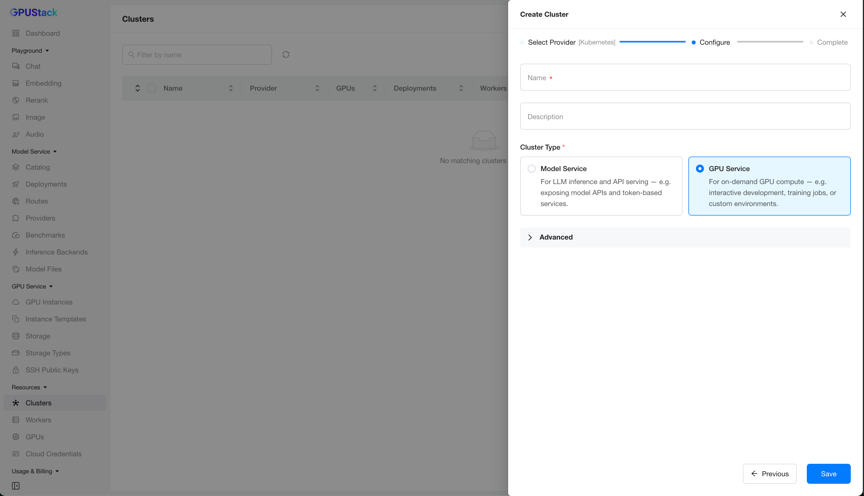
The Create Cluster wizard walks through Select Provider (choose Kubernetes) → Configure → Complete. On the Configure step, fill in the cluster Name and optional Description, select the GPU Service Cluster Type, then click Save.
Warning
A Kubernetes cluster can serve a single purpose only — either Model Service or GPU Service.
Advanced Options
When adding a cluster for GPU Service, expand the Advanced options to configure more settings.
Allow GPU Service Instances to Be Accessed
Usually all Kubernetes nodes sit behind a NAT or firewall, so the node IPs may not be reachable from outside the cluster:
In this case, set an address in GPU Service Static Access Address (for example, a LoadBalancer VIP) so the GPU Service Instances can be reached.

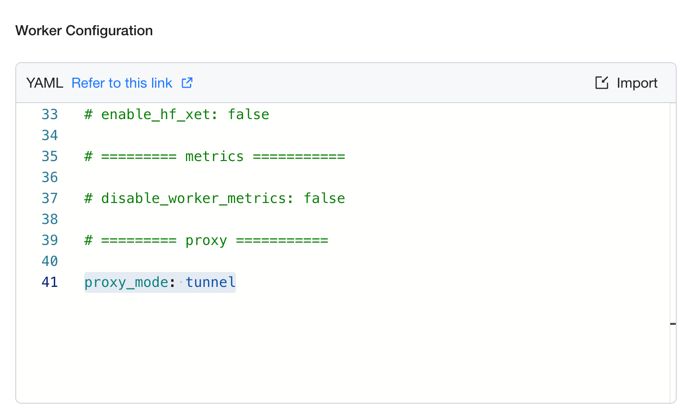
Ensure the GPUStack Worker Is Reachable
Most of the time, GPU Service needs to (reverse-)reach the Kubernetes cluster to manage instances — creating, deleting, and monitoring them.
If the GPUStack server is deployed outside the Kubernetes cluster, set proxy_mode=tunnel in the Worker Configuration to enable the GPUStack Worker Tunnel mode. This keeps a long-lived connection from the worker to the GPUStack server and provides a tunnel for GPU Service to reach the cluster.
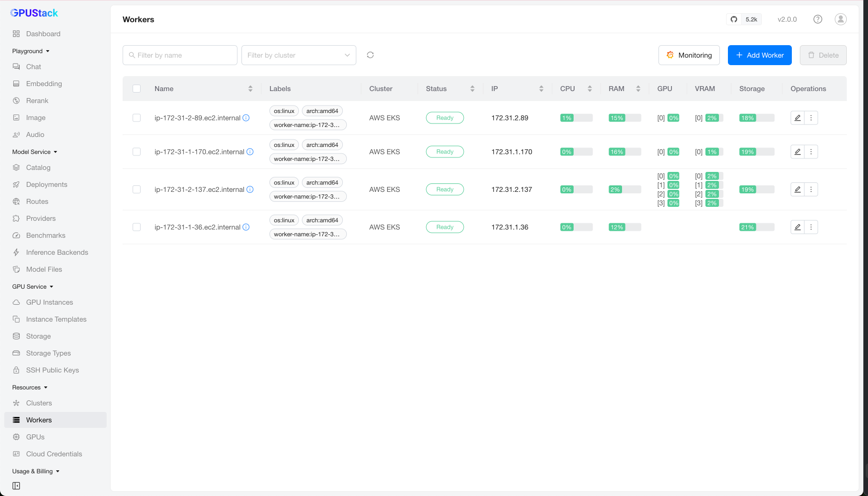
You can verify connectivity between the GPUStack server and worker on the Resources > Workers page by checking the worker's Status column.
Automatic Discovery of Instance Types
After you add a GPU Service-enabled Kubernetes cluster, the GPUStack Operator automatically discovers the GPU devices in the cluster, gathers their information, and generates the corresponding instance types for GPU Service.
To manage instance types, see GPU Service Instance Types. The rest of this page covers deploying and managing instances.
Adding an Instance
On the GPU Service > GPU Instances page, click Add GPU Instance to open the creation form.
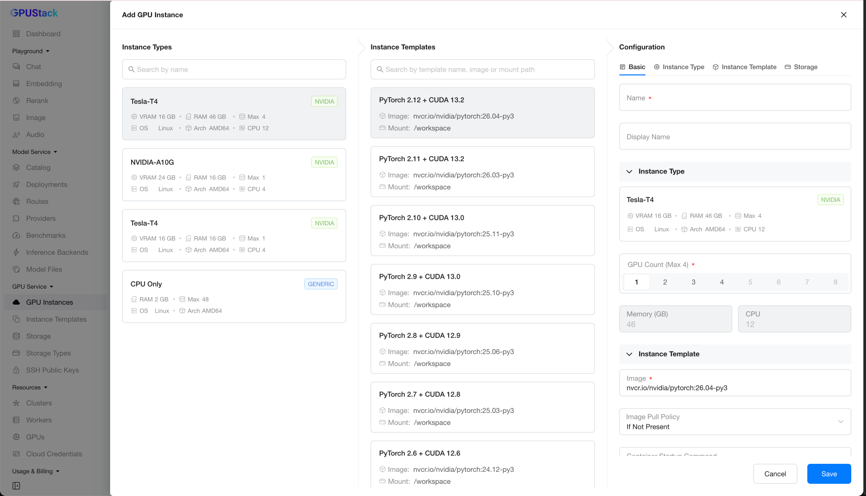
Instance Type Selection
The leftmost Instance Types column lists all instance types discovered from the Kubernetes clusters.
Each instance type card shows the following information:

- Name: The product name of the instance type, such as
Tesla-T4. Products that contain special characters are sanitized to be Kubernetes-safe. - Manufacturer/Vendor: A top-right label showing the manufacturer or vendor (for example,
NVIDIA, orGENERICfor CPU-only). - VRAM: The device memory capacity, in GB.
- Max: The maximum number of devices you can select at once.
- (Unit) RAM/CPU: The resources of a single device.
- OS: The operating system, such as
Linux— useful when choosing a compatible image. - Arch: The CPU architecture, such as
AMD64orARM64— also useful when choosing a compatible image.
Unit Resources of an Instance Type
What are unit resources? Take the Tesla-T4 card above: it is a Kubernetes node with 4 NVIDIA Tesla T4 devices (16 GB VRAM each), 192 GB RAM, and 48 CPU cores. After the node's reserved resources, the usable RAM is about 184 GB. The unit resources of one device are then:
- (Unit) RAM = 184 GB / 4 = 46 GB
- (Unit) CPU = 48 / 4 = 12 cores
Maximum Selectable Devices
A single Kubernetes node holds up to 4 devices in this example, so even across 10 nodes, Max is still 4 — you cannot select 8 devices in one operation.
Max decreases when the total remaining devices of an instance type drop below a single node's capacity.
When Max is 0, all devices of that instance type are allocated, and you cannot select it until some are released.
CPU-Only Instance Type
To improve overall resource utilization, GPU Service also supports CPU-only instance types.
Initially, the GPUStack Operator provides a fixed profile for the CPU-only instance type: 1 CPU + 2 GB RAM. To customize it, see GPU Service Instance Types.
Instance Template Selection
The middle Instance Templates column lists the available templates, and the list updates as you select different instance types.
Templates are managed on the GPU Service > Instance Templates page; see GPU Service Instance Templates.
Instance Configuration
The rightmost Configuration form lets you set the details of the new instance. It is divided into five sections: Basic, Instance Type, Instance Template, Storage, and SSH Access.
- Basic: The instance name and display name.
- Instance Type: The instance type and the number of devices to allocate.
- Instance Template: The template to inherit from (image, command, environment variables, and so on). You can still adjust the configuration after selecting a template.
- Storage: Either
Ephemeralstorage orPersistentstorage. - SSH Access: The SSH public keys to assign to the instance, or the option to disable SSH access.
After completing the form, click Save to create the instance.
Browse Instances
After creation, you return to the GPU Service > GPU Instances page, where all instances are listed with columns such as Name (display name if set), Connect, Status, Instance Type, Cluster, Creator, Created, and Operations.
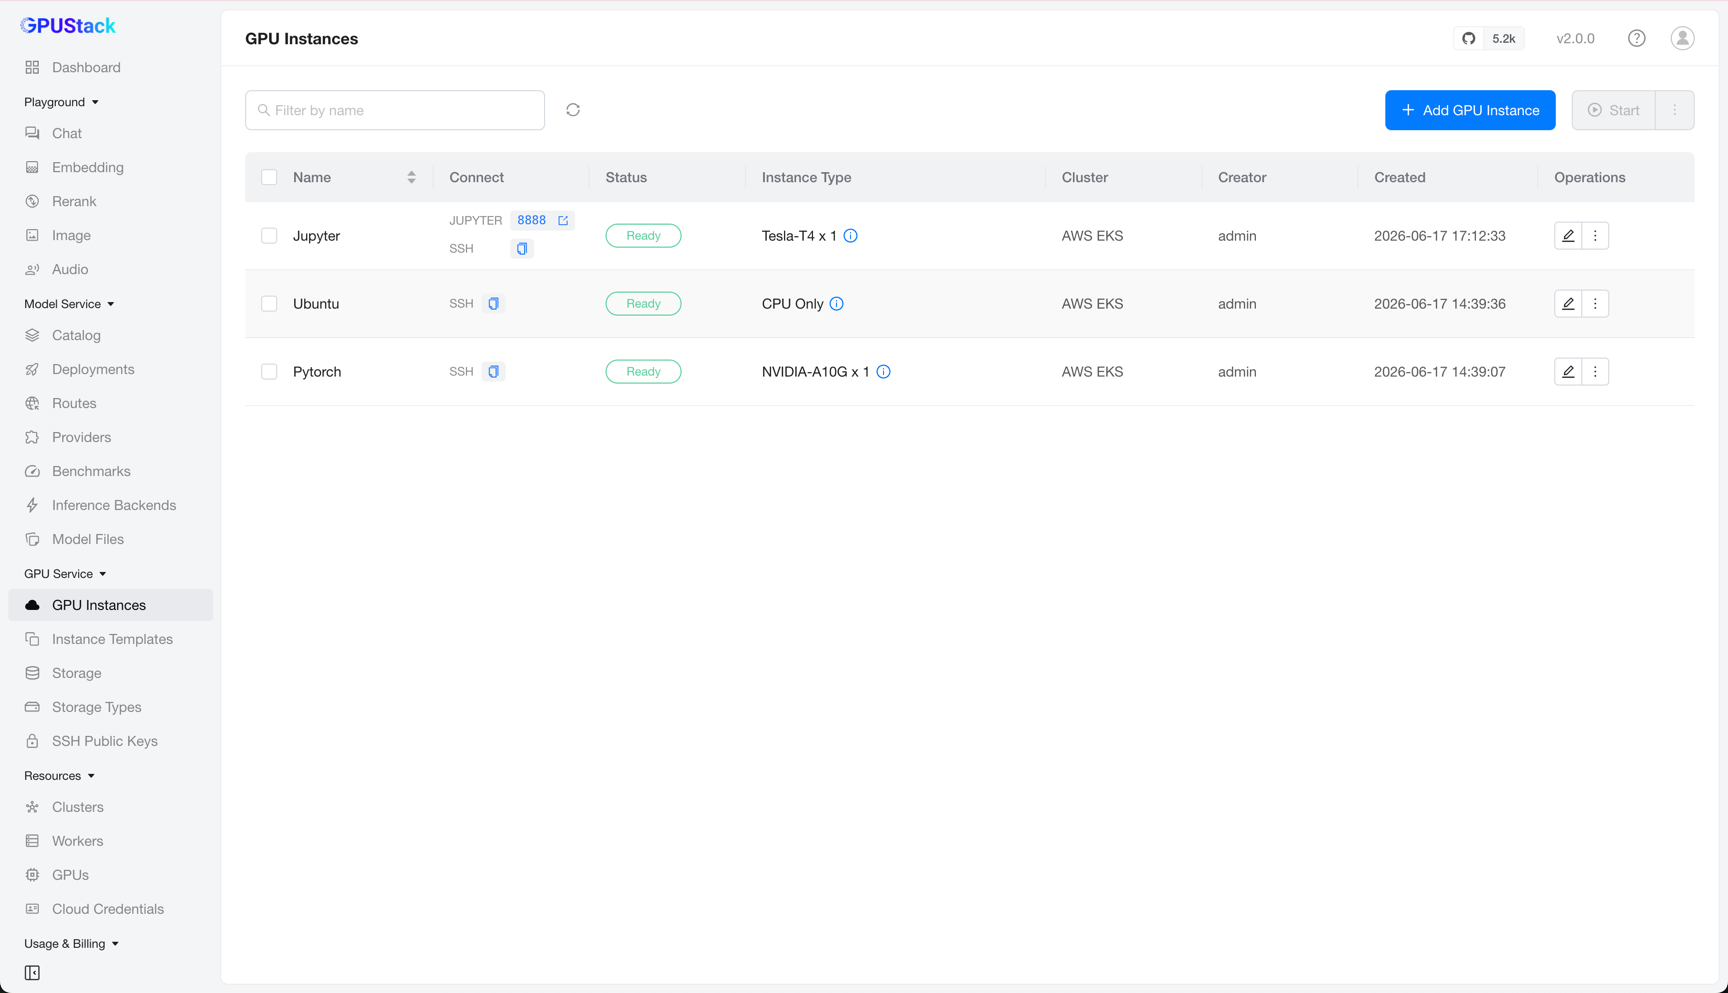
You can filter instances by name.
Accessing an Instance
The Connect column shows the instance's access addresses — a copy-paste SSH command and/or clickable links to web pages — depending on the instance's port configuration.
For example, paste the SSH command into your terminal to connect to the instance directly.
Editing an Instance
Click Edit on an instance to open its configuration.
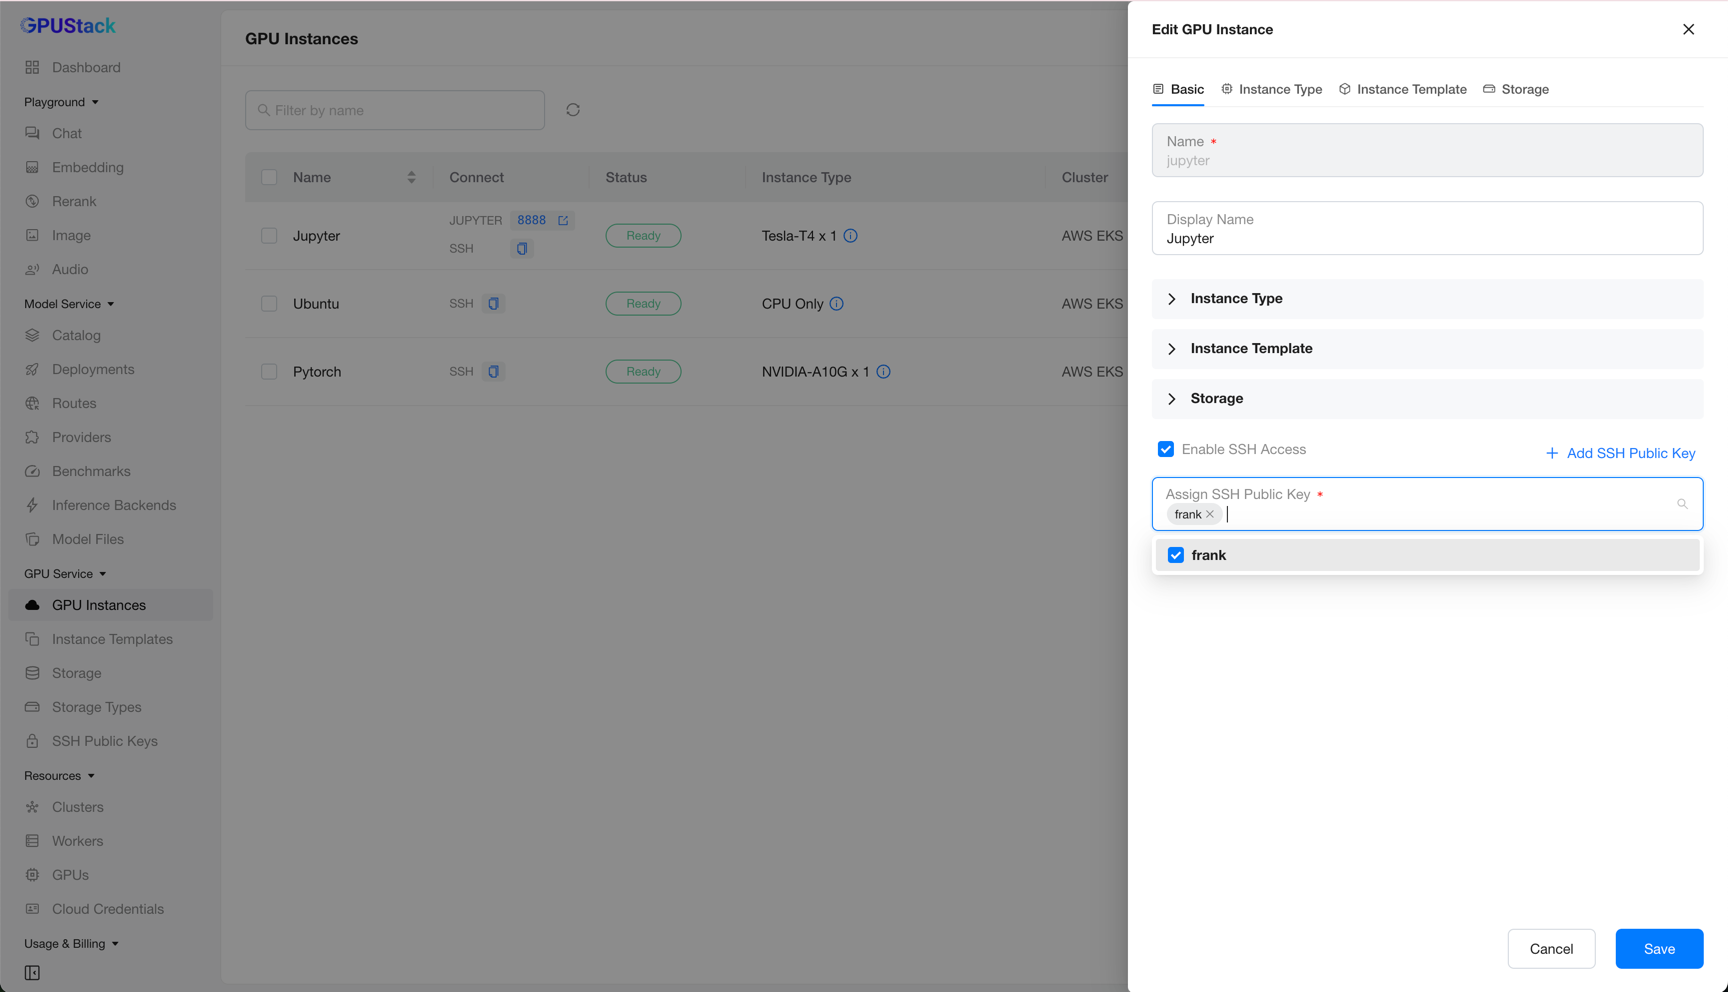
Most fields are not editable yet — only the display name and the SSH access configuration can be changed. You can add or remove SSH public keys, or disable SSH access.
Note
Editing more of the instance configuration is planned for a future release.
Operating an Instance
GPU Service provides several operations on instances: view logs, view events, stop/start, and delete.
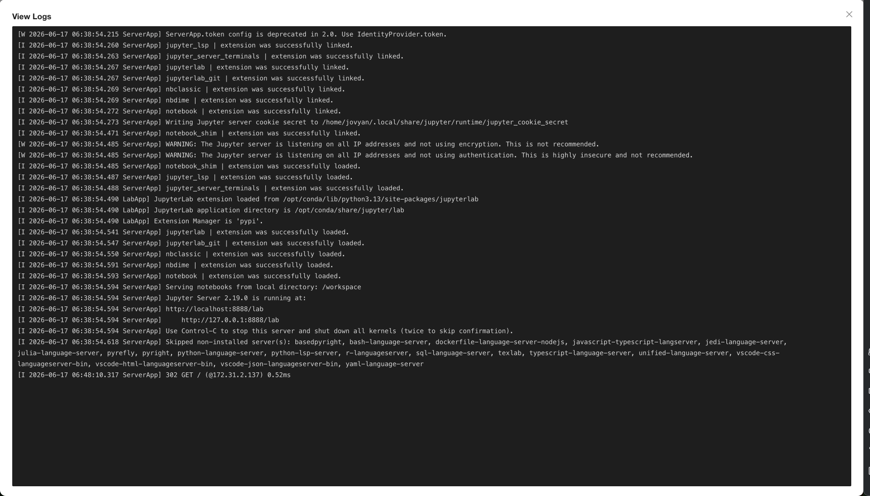
View Logs
Click View Logs to see the instance's logs. This is handy for watching the output of applications such as Jupyter Notebook or TensorBoard.
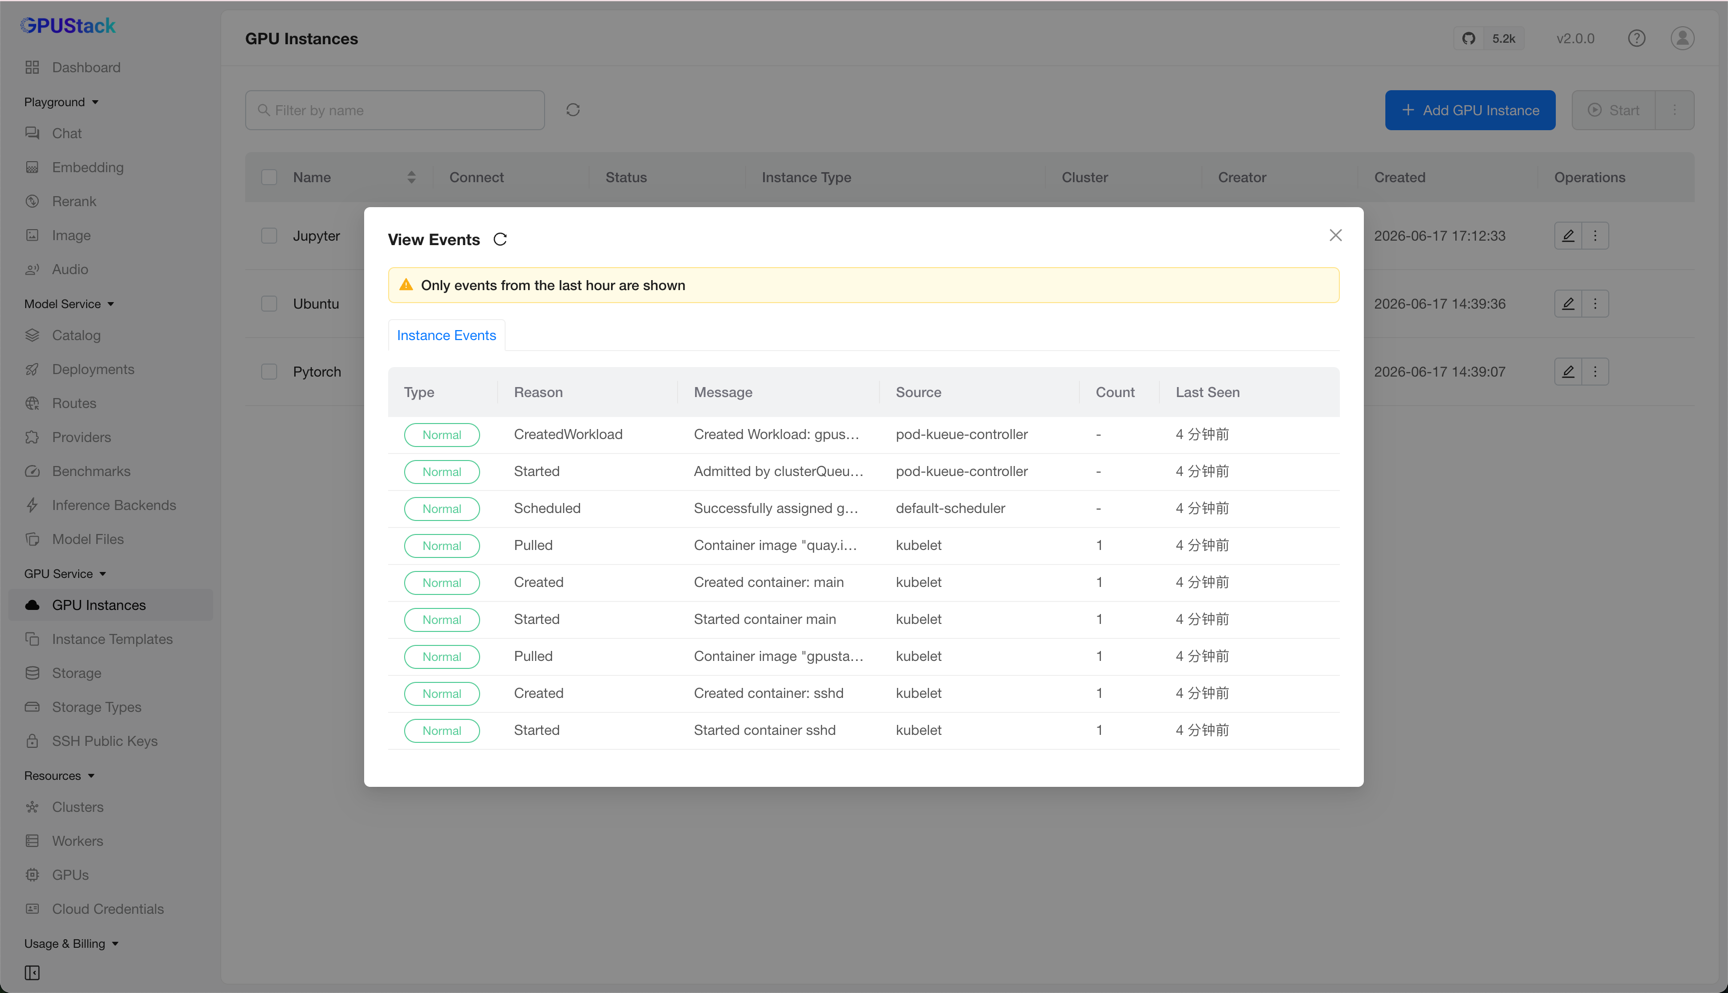
View Events
Click View Events to see the instance's events. This helps you track status changes — for example, an instance stuck in Pending, Running, or Failed.
Stop/Start/Delete
Click Stop to stop an instance and Start to start it again — useful for temporarily freeing resources and resuming work later.
Warning
Stopping an instance releases its compute resources, and starting it re-creates the instance. The instance is then assigned a new IP address, and any data in ephemeral storage is lost.
Click Delete to delete an instance and release all of its resources.